Hi guys! Today I'm gonna show you some Android EditText examples that I usually use in my android applications. Android EditText is simply like a text field, text area or a text input field in online forms. It is an editable TextView.
In this post, we will cover:
- EditText XML Layout Codes with Sample Inputs and Soft Keyboard Screen-shots
- How Get Value from an EditText Programatically
- How to Assign Value to an EditText
- How to Clear Value of an EditText
- Setting MaxLength/Maximum Number of Characters that can be Entered to an EditText
- Limit digits/numeric characters that can be Entered to an EditText
Code:
EditTextExampleActivity.java
package com.example.EditTextExample;
import android.app.Activity;
import android.os.Bundle;
import android.text.Editable;
import android.util.Log;
import android.view.View;
import android.widget.EditText;
import android.widget.Toast;
public class EditTextExampleActivity extends Activity {
/** Called when the activity is first created. */
@Override
public void onCreate(Bundle savedInstanceState) {
super.onCreate(savedInstanceState);
setContentView(R.layout.main);
try {
//plain text input
final EditText plain_edit_text = (EditText) this.findViewById(R.id.editText1);
//number input
final EditText number_edit_text = (EditText) this.findViewById(R.id.editText9);
View.OnClickListener handler = new View.OnClickListener(){
public void onClick(View v) {
//we will use switch statement and just
//get thebutton's id to make things easier
switch (v.getId()){
//toast will be shown with the
//EditText for plain text input
case R.id.ShowPlainTextInput:
Toast.makeText(getBaseContext(),
"Plain Text Input: " + plain_edit_text.getText().toString(),
Toast.LENGTH_SHORT).show();
break;
//the value of EditText for number input
//will be the value of EditText for plain text input
case R.id.AssignToPlainTextInput:
String number_value = number_edit_text.getText().toString();
plain_edit_text.setText(number_value);
break;
//the EditText for plain text input will be cleared
case R.id.ClearPlainTextInput:
plain_edit_text.setText("");
break;
}
}
};
//we will set the listeners of our three buttons
findViewById(R.id.ShowPlainTextInput).setOnClickListener(handler);
findViewById(R.id.AssignToPlainTextInput).setOnClickListener(handler);
findViewById(R.id.ClearPlainTextInput).setOnClickListener(handler);
}catch(Exception e){
Log.e("Android Edit Text Example", e.toString());
}
}
}
main.xml
<?xml version="1.0" encoding="utf-8"?>
<LinearLayout xmlns:android="http://schemas.android.com/apk/res/android"
android:layout_width="fill_parent"
android:layout_height="fill_parent"
android:orientation="vertical" >
<!-- EditText for plain text input -->
<TextView
android:layout_width="fill_parent"
android:layout_height="wrap_content"
android:text="EditText For Plain Text Input:" />
<!--
-We have to add android:singleLine="true"
so that the next line button will be disabled
and multiline effect won't show.
-If you want your EditText to be multiline,
just remove android:singleLine="true"
-android:hint="Type who you are." will give your user
a hint of what has to be typed on that EditText
-<requestFocus /> will focus the cursor on that EditText
when the application starts.
-->
<EditText
android:id="@+id/editText1"
android:layout_width="match_parent"
android:layout_height="wrap_content"
android:hint="Type who you are."
android:singleLine="true" >
<requestFocus />
</EditText>
<!-- EditText for password input -->
<TextView
android:layout_width="fill_parent"
android:layout_height="wrap_content"
android:text="EditText For Password Input:" />
<EditText
android:id="@+id/editText3"
android:layout_width="match_parent"
android:layout_height="wrap_content"
android:inputType="textPassword" >
</EditText>
<!-- EditText for email address input -->
<TextView
android:layout_width="fill_parent"
android:layout_height="wrap_content"
android:text="EditText For Email Address Input" />
<EditText
android:id="@+id/editText4"
android:layout_width="match_parent"
android:layout_height="wrap_content"
android:inputType="textEmailAddress" />
<!-- EditText for phone number input -->
<TextView
android:layout_width="fill_parent"
android:layout_height="wrap_content"
android:text="EditText For Phone Number Input" />
<EditText
android:id="@+id/editText5"
android:layout_width="match_parent"
android:layout_height="wrap_content"
android:inputType="phone" />
<!-- EditText for number input -->
<TextView
android:layout_width="fill_parent"
android:layout_height="wrap_content"
android:text="EditText For Number Input:" />
<EditText
android:id="@+id/editText9"
android:layout_width="match_parent"
android:layout_height="wrap_content"
android:inputType="number" />
<!-- EditText for signed number input -->
<TextView
android:layout_width="fill_parent"
android:layout_height="wrap_content"
android:text="EditText For Signed Number Input:" />
<EditText
android:id="@+id/editText10"
android:layout_width="match_parent"
android:layout_height="wrap_content"
android:inputType="numberSigned" />
<!-- EditText for decimal number input -->
<TextView
android:layout_width="fill_parent"
android:layout_height="wrap_content"
android:text="EditText For Decimal Number Input:" />
<EditText
android:id="@+id/editText11"
android:layout_width="match_parent"
android:layout_height="wrap_content"
android:inputType="numberDecimal" />
<!-- Some options with EditText -->
<TextView
android:layout_width="fill_parent"
android:layout_height="wrap_content"
android:text="Try these options:" />
<LinearLayout
android:orientation="horizontal"
android:layout_width="wrap_content"
android:layout_height="wrap_content"
android:layout_centerInParent="true"
android:layout_centerVertical="true"
android:layout_centerHorizontal="true">
<!-- Button to show plain text input -->
<Button
android:id="@+id/ShowPlainTextInput"
android:layout_width="114dp"
android:layout_height="wrap_content"
android:text="Show Plain Text Input" />
<!-- Button to assign number input to plain text input -->
<Button
android:id="@+id/AssignToPlainTextInput"
android:layout_width="177dp"
android:layout_height="wrap_content"
android:text="Assign Number Input to Plain Text Input" />
<!-- Button to clear plain text input -->
<Button
android:id="@+id/ClearPlainTextInput"
android:layout_width="wrap_content"
android:layout_height="wrap_content"
android:text="Clear Plain Text Input" />
</LinearLayout>
</LinearLayout>
Just in case you want to download the code above:

Output:

Screen-shots with some explanations of using the above code:
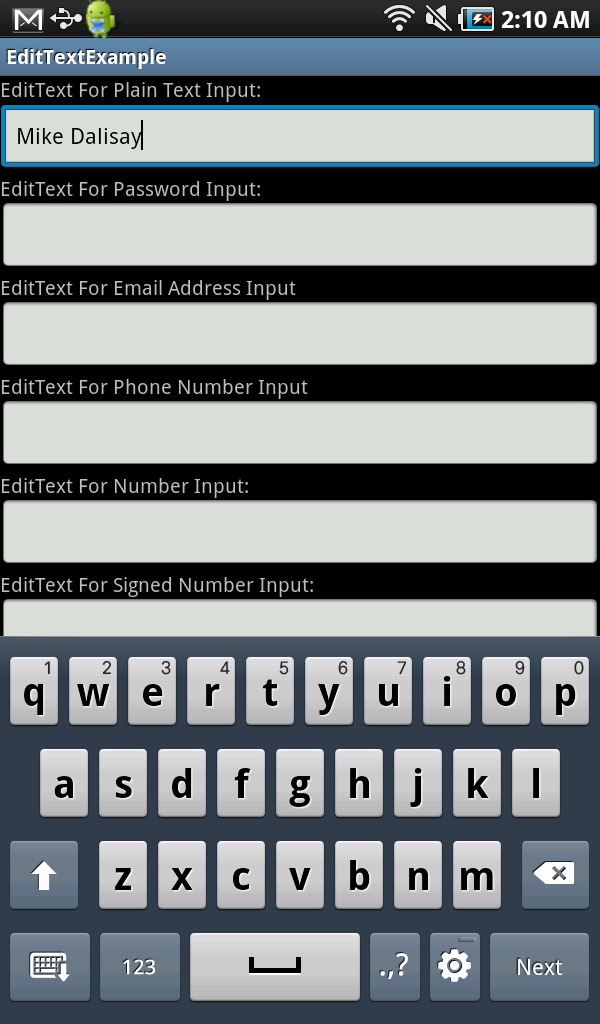
1. EditText for Plain Text Input
- Softkeyboard allows you to use any characters available.
2. EditText for Password Input
- Softkeyboard allows you to use any characters available.
- The EditText field shows no characters.

3. EditText for EmailAddress Input
- Softkeyboard shows the @ and .com buttons this time.

4. EditText for PhoneNumber Input
- Softkeyboard allows you to enter numbers and any characters acceptable for phone numbers like *, #, -, etc.

5. EditText for NumberInput
- Softkeyboard allows you to enter only numbers this time.

6. EditText for Signed Number Input
- Softkeyboard allows you to enter numbers and negative sign.

7. EditText for Decimal Number Input
- Softkeyboard allows you to enter only decimal numbers.

8. Show Value of Plain Text Input (How Get Value from an EditText)
- Tapping "Show Plain Text Input" button will show a Toast with value of our edittext for plain text input.

9. Assign Value of Number Input to Plain Text Input (How to Assign Value to an EditText)
- Tapping "Assign Number Input to Plain Text Input" button will copy the value of our EditText for number input and put it to our EditText for plain text input.

10. Clear Value of Plain Text Input (How to Clear Value of an EditText)
- Tapping "Clear Plain Text Input" button will empty our EditText for plain text input the only show the "hint" we specified on the XML.
The code below does the following (also read comments on code):
- Set maximum number of characters that can be entered to the EditText.
- Limit digits/numeric characters that can be entered to the EditText.
<?xml version="1.0" encoding="utf-8"?>
<LinearLayout xmlns:android="http://schemas.android.com/apk/res/android"
android:layout_width="fill_parent"
android:layout_height="fill_parent"
android:orientation="vertical" >
<!-- Set MaxLegth EditText -->
<TextView
android:layout_width="fill_parent"
android:layout_height="wrap_content"
android:text="Set MaxLegth of 5 for EditText:" />
<EditText
android:id="@+id/editText3"
android:layout_width="match_parent"
android:layout_height="wrap_content"
android:maxLength="5">
</EditText>
<!-- Allow digits 0,1,2,3,4,5 Only. 6, 7, 8, 9 is not allowed. -->
<TextView
android:layout_width="fill_parent"
android:layout_height="wrap_content"
android:text="Allow Digits 0,1,2,3,4,5 Only:" />
<EditText
android:id="@+id/editText4"
android:layout_width="match_parent"
android:layout_height="wrap_content"
android:digits="012345" />
</LinearLayout>
Just in case you want to download the code above:
Output:


Good Post...... Helped me a lot
ReplyDeleteLiked it.. Thank you
ReplyDelete